Friday 13 November 2009

Mini Fuzzy-haired Troll - Free pattern

I made these for our school's Christmas Bazaar last year - they're quick, easy and fun to make.


Materials:
Some mohair yarn for the hair
Plain yarn for the body
Black yarn to embroider the features
3.5mm hook
Stuffing
A wire pet brush to make the hair fuzzy

Abbreviations:
ch = chain
st = stitch or stitches
sc = single crochet (US), double crochet (UK)
dc = double crochet (US), treble crochet (UK)
ss = slip stitch
tog = together
FO = fasten off

Special stitch instructions:
3 dc popcorn stitch: Work 3 dc into 1 sc, remove hook from working loop, push through both loops of first dc and pull working loop through.
3 dc bobble stitch: Work first part of dc 3 times into 1 stitch, leaving 4 loops on hook, pull through all 4.
This troll is made in rounds. Do not join rounds, use a stitch marker to mark the start of a round - a small piece of different coloured yarn placed under the stitch at the start of the round will do.

Mohair yarn:
Round 1: Ch 2, work 6 sc into 1st ch - 6 sc.Round 2: 2 sc in each sc around - 12 sc.Round 3: [2sc in next sc, sc in next sc] 6 times – 18 sc.
Plain yarn:
Round 4 – 5: (2 rounds) Sc in each sc around – 18 sc.
Round 6: To make ears: Sc in next 4 sc, 3dc popcorn stitch into next sc, sc in next 8sc, 3dc popcorn stitch into next sc, sc in next4 sc – 18 sc
Round 7: Sc in each sc around – 18 sc
Round 8: [Sc 2 tog, sc in next sc] 6 times – 12 sc.
Round 9: Sc in each sc around – 12 sc
Round 10: To make arms: Work sc in each sc around until you get to the sc under the first ear then make arm as follows: ss into sc, ch7, 3dc bobble stitch into 3rd ch from hook, ss into next 4 ch, ss back into original sc. Work sc in next 5 sc, make the other arm, sc in each sc until the end of the round - 12st.
Round 11: Sc in each sc around – 12 sc (you sc into the first ss used to make each arm).
Round 12: Sc in each sc around – 12 sc.
Round 13: [2sc in next sc, sc in next 3 sc] 3 times - 15sc.
Round 14: Sc in each sc around – 15 sc.
Round 15: [2sc in next sc, sc in next 4 sc] 3 times - 18sc.
Round 16: Sc in each sc around – 18 sc.
Round 17: To make feet: Find the stitch in the front middle of your troll. Then count back 4 stitches before that (not including the middle stitch) and mark this stitch. Work sc in each sc around until you get to the marked stitch. Make toes: [3dc popcorn stitch] 3 times, sc in next 3 sc, [3dc popcorn stitch] 3 times, sc in each sc around to the end of the round.
Now stuff your troll and embroider the eyes and mouth with black yarn.
Round 18: [Sc 2 tog, sc in next sc] 6 times – 12 sc.
Round 19: [Sc 2 tog] 6 times – 6 sc. FO.
Complete stuffing and sew up hole neatly.
Use the wire brush on the mohair to make it fuzzy, and your troll is now complete!

Wednesday 16 September 2009

Flora the Elephant


I've finally finished my first pattern to go in my Etsy shop. She's a cute little elephant that I'd made a couple of times before so I knew I'd be able to recreate her. Having two little boys means I don't usually make things wearing pink dresses, but I do love elephants and it's fun to combine them together. I love the shape of her head and I think she looks very shy.

Sunday 6 September 2009

Dream Spirit

Here is my latest creature.


She is a Dream Spirit, she herds the dreams that float through the air to make sure that each dream gets to the right dreamer. Not just for humans, either. Animals and, who knows, maybe even plants dream, and she has to make sure that dreams do not go astray.


I made her using one my favourite yarns, an alpaca mix. She's a simple shape (using the same basic pattern as my Rock Spirit) that I enjoyed embellishing with various scraps of fuzzy yarns to make her 'whiskers' and then I gave her curved horns/ears. I got a kind of witchy/shaman vibe from her when she was finished and then I could see what she was.


Here's her relative, the Rock Spirit:


Friday 21 August 2009

Yubbla

Here's my latest creature - a Yubbla. These are creatures that live in mossy areas around the roots of trees and rocks. They hop around, eating bugs and fungi, their horns giving them a good defence against any predators. They are very friendly and should be encouraged into gardens, as they are great at eating up pests such as slugs.


I got the idea for him back in the spring when I was looking at some very knobbly trees in Petworth Park.


It made me think of a creature that was faintly frog-like with bulgy eyes and big, round haunches. I drew a quick sketch and added in horns since they seemed to fit. Then I got busy making other things and didn't think any more about it.

Recently I started to make another creature using the green mohair but the shape was wrong. I looked at what I'd done and realised it would make the perfect body for my Yubbla. I found the old sketch and even though I tried out a few different ideas, it ended up looking pretty similar, although I did add a tail to make it less froggy. When it was finished I found it very endearing. There's something about the positioning of the eyes that means they seem to foloowing you around, but in a puppy way, not a creepy way.

This Yubbla is now up for sale in my Etsy shop.

Saturday 15 August 2009

Fuzzy Monkey

I love monkeys - toy ones are cute, and I could watch the real ones for hours. Whenever I go to a zoo I especially like the little guys such as spider monkeys, tamarins and marmosets. I watch their tiny little almost human faces and really want to translate that into amigurumi. The only trouble is that I've made a few amigurumi monkeys, but I don't always feel that I succeed completely, I think I try too hard with the faces and get them wrong.


So for my latest attempt, I kept it simple and didn't try to copy a real monkey. I have some neon green mohair-type yarn that I've been wanting to use, so I decided that would be perfect for the head and body. I made a very simple face, and decided that quite large eyes looked best but with no other features. I gave him long arms and short legs, which probably is more appropriate for an ape, but again it just seemed to work. He ended up with a stripy tail, because I thought a bit of blue mixed in with all the green would look nice, so that makes me think of a lemur. Anyway, I'm really happy with him, even if he is some bizarre primate mix, and he's up for sale in my Etsy shop now.

Saturday 18 July 2009

Earth Spirits


I've just completed these custom Mother and Child Earth Spirits. I tried out a new yarn (Paton's Spirit, appropriately enough) and it comes out lovely and fuzzy when you brush it. It was a mix of autumnal colours, and then I also used a deep red mohair to give a bit more variation.


Dawn Spirit and Tumpkin

I was asked to make the creatures with some similarities to my Dawn Spirit and Tumpkin, so I decided to try doing them with pointed heads, but ones which are angled backwards, and with ears and horns somewhat like the Dawn Spirit.


I was really pleased at the way the mother came out - you can never tell when you start crocheting, whether the idea you have in your head is going to work, but it seemed to this time.


It was fun to try and make the child, to do it not just smaller, but differently proportioned so that, hopefully, it seems childlike. I used the same sized eyes, so that they would seem bigger - I think eyes are the only part of the body that never grow. I also gave him much smaller ears, and no horns - he's too little to have those yet.

Well, I was very happy with them both, and so was my 7 year-old son. He looked at the child just after I'd finished it and said, "Can I have him?"
I explained that I'd made him especially for someone else, so no, he couldn't. He then said, "All right, I'll have the Mummy one then!"
He was none too pleased when I said that they were both already taken - I think I'll have to make him something soon!

Tuesday 23 June 2009

Wicket the Ewok


A few years ago I made my Star Wars mad son an Ewok amigurumi, Wicket to be precise. I posted it up on Craftster, and even managed to write a tutorial on how to make it. It was fairly rough, so in an attempt to practice my pattern-writing skills and try out making PDFs (in the hope that I will be able to put some of my patterns on Etsy) I now present the latest updated version:

Download PDF

**Edited to add**

I know the link above can be a bit unreliable, so I've now also put up a recently updated version of the pattern as a download in my Ravelry store: http://www.ravelry.com/stores/lucy-ravenscar-designs

Saturday 13 June 2009

Party Time!

It was my son's 9th birthday not too long ago, and although he was only having a few friends round he wanted me to decorate a bit. I've been making decorations for his and his brother's parties all their lives - in fact I think that was the first thing that got me into being more crafty. That or the fact that I'm cheap, I hate paying for rubbish party stuff that won't last.


I've made rockets out of toilet rolls, a crocodile out of egg boxes, and a Dalek pinata that I liked so much I made sure only the bottom half got destroyed, and I made a Dalek costume later with the top half.


This year my son wanted a medieval theme - he was getting Little King's Story for the Wii so it seemed to fit. I painted lots of coats of arms a few years ago for a Knights and Princesses party, so I stuck those up, but I thought it would be nice to make something that could be put up for any birthday. So I crocheted some bunting (I'm not sure what else to call it). I already did this for Christmas in green and red, so I made this one multicoloured. It's pretty easy to make, so here's the pattern:


Crochet Bunting

You will need:

Yarn (cheap acrylic is fine) in whatever colour or colours you want. How much you'll need will depend on how long you make it, but if you use two colours, 100g ball of each should get you quite a long way.
6mm hook (US J/10)

Method (using US notation):

Using just two colours is the simplest way to do this.
Work 2 strands together to start.
Ch 48
* Using only 1 strand ch 16, turn.
Miss 1st ch, [sc, hdc in next ch], [2 dc in next ch] 13 times, [hdc, sc in last ch].
Join back into the double strand by working a slipstitch with both strands.
Ch 15 *
Work from * to *, alternating which colour you use to form the spiral, as many times as necessary to fit your room.
Ch 48, Fasten off.

The lengths of chain at the beginning and end are long enough to make loops to go round the end of curtain poles (which is how I secure them), or tie around whatever is handy.


For multicoloured bunting, I changed one yarn after every 4 spirals and simply knotted the new colour to the old, crocheting over the ends.


I also decided, the day before his birthday, that it would be cool for my son to have a crown, so he could be king for a day. I didn't think I had time to make anything so I went along to a toyshop to get a plastic one. Unfortunately it was just a bit too small, so instead I grabbed some yellow felt, sew-on jewels and gold braid and made one. I just folded the felt over three times, cut some points and glued those together, to make them a bit stiffer. I sewed on the braid and the jewels, and put a bit of elastic in the back so it would fit him for longer (and fit his little brother who has a bigger head!). I will sew the points together to make them a bit stronger, but I haven't had time yet.


He loved it and wore it all day, and has worn it several times since, so I was really pleased with my last minute crown.

Friday 12 June 2009

Dandelion Dragon

I've been thinking vaguely about making some kind of Chinese dragon for a while now. I like their sinuous bodies and the fact that they're usually seen as good-natured rather than fierce. I decided I wanted to make one that was sitting up, so it would seem curious and not so active. This is what I came up with.
I gave him a ruff, which, particularly with addition of horns, gave the impression of venerable white hair and a beard. That made me think of him as a very old, peaceful dragon. I imagine that he moves slowly about the garden, bending his long neck to peer at all the plants and contemplating the world.


I like that Chinese dragons often seem furry rather than scaly, so I gave him a soft, fuzzy mohair spine frill.


I'm very fond of his face and pleased at how it came out, it seems quite youthful and innocent (maybe it's those big blue eyes), but I still feel he's been around for a long time.

Thursday 11 June 2009

My claim to fame


I never know how to start the first post of a blog, and this is my first proper blog, so I don't have much experience. Why have I started this? Well, I like making things, and whilst I already post photos up on Flickr and show things off on Craftster (as Angry Angel), I thought it would be nice to have one place where I could keep everything together.

I have a few projects that I've been working on - I'm re-writing my free patterns and will post them here, I've recently finished a new crochet creature ready to go into my Etsy shop, and I'm busy designing cute little Star Wars amigurumis - but for my first post I thought I'd share my geeky crochet claim to fame.

Nearly two years ago I was contacted by a television production company asking if they could use a photo of Wicket the Ewok that I had crocheted. I said yes, but never heard anything else from them.


Then, last autumn an eagle-eyed crafter contacted me and said she'd seen him on a Channel 4 programme, Bring Back.... Star Wars, with Justin Lee Collins. I checked out the repeat, and there he was! The show has Justin contacting the various actors from Star Wars and trying to get them back together. He had a big board with photos with all the actors, generally publicity shots from their agents. But bizarrely, for Warwick Davies they had a copy of my picture! Anyway, I was very excited to see my Ewok on telly. Here it is on YouTube, you can see the picture after 4m 30s : http://www.youtube.com/watch?v=XhdbFVMY6DM&feature=related

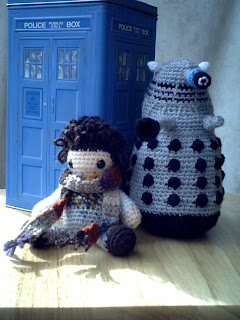
However, this was just the beginning. Not long after that I had an email from Hat Trick Productions, asking if they could use my photo of a crocheted Dalek and Doctor Who for an episode of Have I Got News For You with Tom Baker as the guest host. Of course, I said yes (they paid me too, which was even better!), and since HIGNFY is filmed only a day before it's shown, I soon got to see my creations up on screen. Having advance notice was good because I got to tell a few friends and family so they could watch too.
Here's the clip on YouTube: http://www.youtube.com/watch?v=-pYj82q2SDQ - my photo turns up 1m 20s in. I was rather pleased that none of the panellists were rude, it even got a couple of jokes!
So, that's got me started. If anyone would like to make their own Wicket the Ewok watch this space. I originally put up a simplified tutorial on Craftster, but I've written into a more conventional format and as soon as I've given it a test, I'll be posting my pattern here.