Monday 21 April 2014

Adorable Alpacas

Recently I was asked by Practical Publishing to design some alpaca patterns for their Crochet Gifts magazine/bookazine. I've been away for the weekend, and I came back to find that the magazine had arrived (I think it's due out in the shops on 24th April), and I was delighted to find my colourful alpacas on the front cover!


They're made using Stylecraft Alpaca DK, an acrylic yarn with some alpaca wool mixed in, which makes it lovely and soft. There are two sizes of alpaca you can make, an adult and a baby, and you can make them in natural colours, or make them in fun, bright colours as I did.

Having just had a skim through the magazine it's full of interesting projects including lots of lovely toys and accessories (I definitely want to try the leather and crochet bracelet), so I'm really pleased my patterns are in there.

*Update: you can now buy the pattern in my Etsy shop *

Wednesday 9 April 2014

Quick and Easy Easter Bunny - free pattern!


Whilst I was making the Little Teddies from the previous post, I realised it wouldn't take much turn them into little bunnies. They don't take very long to make, and you only need scraps of yarn, so they're perfect little extras to make for an Easter basket. I made a couple using pastel self-striping yarn, which seemed nice and spring-like, then I made one in brown yarn to be a little chocolate bunny.


Easter Bunny

 
This little bunny will end up about 4.5 cm/1.75" tall, not including ears, depending on the yarn you use.
 
Abbreviations:
ch = chain
st = stitch or stitches
ss = slip stitch
sc = single crochet (US), double crochet (UK)
dc = double crochet (US), treble crochet (UK)
tog = together
sc2tog = decrease by working two sc together
pop = popcorn (see special stitch instructions)
FO = fasten off

General instructions:
Work in rounds unless otherwise stated and do not join rounds unless told to. Use a stitch marker to mark the start of a round - a small piece of different coloured yarn placed under the stitch at the start of the round will do. To start a round, you can use the magic ring method, but I prefer (ch 2, work 6 sc into 1st ch). The first ch is a slip knot so it will expand and if you work the 6 sc over the tail of yarn as well you can use that to pull the hole tight.

Work through both loops of stitches unless otherwise indicated.
 
Special stitch instructions:

3 dc pop: popcorn stitch for tail. Work 3 dc into 1 st, take hook out leaving loop, put hook through 1st dc & pull loop through.
(When changing colour for the tail work the sc before the change until there are two loops left on the hook. Then use the new colour for the final yarn over hook and pull through. When changing back to the main colour after doing a 3dc pop work the last dc of the popcorn until there are two loops left on the hook. Then use the main colour for the final yarn over hook and pull through. Finish making the popcorn st and you will have the main colour on your hook for the next stitch.)

4 dc pop: popcorn stitch for arms and legs. Work 4 dc into 1 st, take hook out leaving loop, put hook through 1st dc & pull loop through.

You will need:
Small amount of yarn, any colour you like, in double knitting or worsted weight.
Small amount of white or cream yarn for tail.
Small amount of black yarn (or cream and pink for chocolate bunny) for eyes and mouth.
Small amount of stuffing.
3.5mm (E) hook.
 

Round 1: Ch 2, work 6 sc into 1st ch - 6 st.
Round 2: [2 sc in next st, (sc and ss into next st, (ear) ch 6, sc into 2nd ch from hook, dc into next 3 ch, sc into next ch, ss back into original st), 2 sc in next st] 2 times - 12 st (the ss used to start the ear counts as a st, and you will work into it on the next round).
Round 3: [2 sc in next st, sc in next st] 6 times – 18 st.

Round 4 - 6: (3 rounds) Sc in each st around - 18 st.
Round 7: [Sc2tog, sc in next st] 6 times – 12 st.
Round 8: [Sc2tog, sc in next 2 st] 3 times – 9 st.
Round 9: [2 sc in next st, sc in next 2 st] 3 times – 12 st.
Round 10: Sc in next 5 st, 4dc pop, sc in next 4 st, 4dc pop, sc in next st - 12 st.
Round 11 - 12: Sc in each st around - 12 st.
Round 13: [2 sc in next st, sc in next 3 st] 3 times – 15 st.
Round 14: Sc in next 4 st, change to tail colour yarn, 3dc pop, change back to main yarn, sc in next 4 st, 4dc pop, sc in next 3 st, 4dc pop, sc in next st - 15 st.
Round 15: [Sc2tog, sc in next 3 st] 3 times – 12 st.
Round 16: [Sc2tog] 6 times – 6 sc. FO, leaving a length of yarn.
 
Stuff head and body and embroider features. Use length of yarn to sew up hole at bottom, pulling yarn upwards through body to make sure the bottom is flat. You can also use this yarn to sew a stitch or two at the bottom of each ear to make sure they're pointing forwards.


Mini Teddies - free amigurumi patterns!

If you've read previous entries in this blog, you'll know that over the last few years I've made lots of small amigurumi toys for the Christmas Bazaar at my sons' school, and I've tried to share the various patterns. Originally I posted the patterns on Craftster, including one for tiny teddies -http://www.craftster.org/forum/index.php?topic=289504.msg3296032#msg3296032  
Another member, Wayuki, liked the pattern and changed it a bit -
http://www.craftster.org/forum/index.php?topic=298179.msg3398743#msg3398743
I liked the way she made the heads of the teddies bigger, so I tried her version and tweaked it a bit myself, and I've used my second version to make lots of teddies for the Bazaar.
 
 
I know people have used my original Tiny Teddy pattern and had fun with it, so I thought I'd post that (with a few little alterations) and the larger Little Teddy pattern, so you can make either or both of them as you like. I've made a pair of the two different sizes using candy-coloured self striping yarn, then I've used natural coloured yarns to make two Tiny Teddies and one Little Teddy, so you can compare them.
 
 
Abbreviations:
ch = chain
st = stitch or stitches
sc = single crochet (US), double crochet (UK)
dc = double crochet (US), treble crochet (UK)
tog = together
sc2tog = decrease by working two sc together
bob = bobble (see special stitch instructions)
pop = popcorn (see special stitch instructions)
FO = fasten off
 
General instructions: Work in rounds unless otherwise stated and do not join rounds unless told to. Use a stitch marker to mark the start of a round - a small piece of different coloured yarn placed under the stitch at the start of the round will do. To start a round, you can use the magic ring method, but I prefer (ch 2, work 6 sc into 1st ch). The first ch is a slip knot so it will expand and if you work the 6 sc over the tail of yarn as well you can use that to pull the hole tight.
 
Work through both loops of stitches unless otherwise indicated.
 
Special stitch instructions:
3 dc bob: bobble stitch for Tiny Teddy ears. YOH (yarn over hook), insert hook into next stitch, YOH and pull through loop, YOH, pull through 2 loops, *YOH, insert hook into same stitch, YOH and pull through loop, YOH, pull through 2 loops, repeat once from*, YOH, pull through all 4 loops on hook.
3 dc pop: popcorn stitch for Little Teddy ears. Work 3 dc into 1 st, take hook out leaving loop, put hook through 1st dc & pull loop through.
4 dc pop: popcorn stitch for arms and legs. Work 4 dc into 1 st, take hook out leaving loop, put hook through 1st dc & pull loop through.
 
 
You will need:
Small amount of yarn, any colour you like, in double knitting or worsted weight.
Small amount of black yarn for eyes and mouth.
Small amount of stuffing.
3.5mm (E) hook.


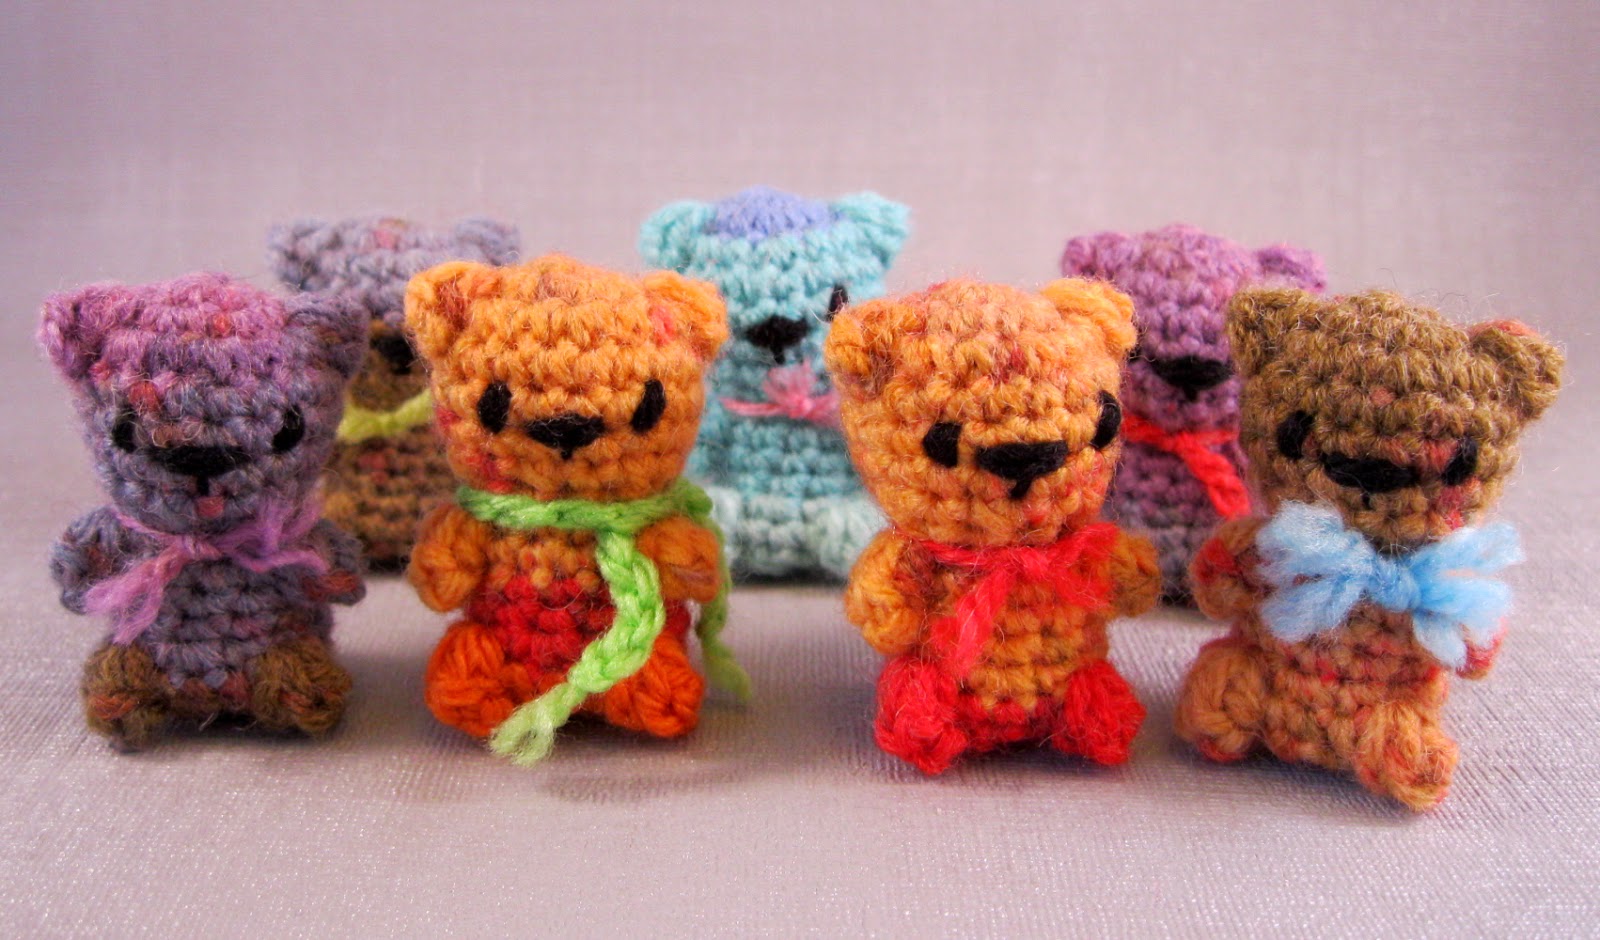
Little Teddy in middle, Tiny Teddies on left and right


Tiny Teddy
 
These teddies really are tiny - depending on the yarn you use they'll be about 3.5 cm/1.5" tall.
 
Round 1: Ch 2, work 6 sc into 1st ch - 6 st.
Round 2: [2 sc in next st, (3dc bob and sc in next st), 2 sc in next st] 2 times - 12 st.
Round 3 - 4: (2 rounds) Sc in each st around - 12 st.
Round 5: [Sc2tog, sc in next st] 4 times – 8 st.
Round 6: [2 sc in next st, sc in next 3 st] 2 times – 10 st.
Round 7: Sc in next 4 st, 4dc pop, sc in next 3 st, 4dc pop, sc in next st - 10 st.
Round 8: Sc in each st around - 10 st.
Round 9: 2 sc in next st, sc in next 2 st, 2 sc in next st, sc in next 6 st – 12 st.
Round 10: Sc in each st around - 12 st.
Round 11: Sc in next 7 st, 4dc pop, sc in next 3 st, 4dc pop - 12 st.
Round 12: [Sc2tog] 6 times – 6 sc. FO, leaving a length of yarn.
 
Stuff head and body. Push the bobbles on the head outwards and embroider features using black yarn. Use length of yarn to sew up hole at bottom, pulling yarn upwards through body to make sure the bottom is flat.
 
    
Little Teddy
 
These cute little teddies will end up about 4.5 cm/1.75" tall, depending on the yarn you use.
 
Round 1: Ch 2, work 6 sc into 1st ch - 6 st.
Round 2: 2 sc in each st around - 12 st.
Round 3: [2 sc in next st, sc in next st, 2 sc in next st, 3dc pop in next st, 2 sc in next st, sc in next st] 2 times - 18 st.
Round 4 - 6: (3 rounds) Sc in each st around - 18 st.
Round 7: [Sc2tog, sc in next st] 6 times – 12 st.
Round 8: [Sc2tog, sc in next 2 st] 3 times – 9 st.
Round 9: [2 sc in next st, sc in next 2 st] 3 times – 12 st.
Round 10: Sc in next 5 st, 4dc pop, sc in next 4 st, 4dc pop, sc in next st - 12 st.
Round 11 - 12: (2 rounds) Sc in each st around - 12 st.
Round 13: [2 sc in next st, sc in next 3 st] 3 times – 15 st.
Round 14: Sc in next 9 st, 4dc pop, sc in next 3 st, 4dc pop, sc in next st - 15 st.
Round 15: [Sc2tog, sc in next 3 st] 3 times – 12 st.
Round 16: [Sc2tog] 6 times – 6 sc. FO, leaving a length of yarn.
 
Stuff head and body and embroider features using black yarn. Use length of yarn to sew up hole at bottom, pulling yarn upwards through body to make sure the bottom is flat.


Tiny Teddy on left, Little Teddy on right


Saturday 5 April 2014

Easter Patterns

Just a quick post to highlight some of my patterns that might make good presents for Easter. In my Etsy shop you can find my Woolly Jumpers pattern, which gives you instructions to make a cute little rabbit or lamb, either a boy in a sweater or a girl in a little skirt.


 I also think my Chubby Gnomes pattern is quite fun for Easter - the gnomes are actually egg-shaped, and I associate gnomes with gardens and all the new spring growth.


Here on my blog I have some free patterns that are perfect for small extra Easter gifts (and good if you're worried about too much chocolate!). They're quick and easy to make, and need hardly any sewing to finish them off. Just click on the names below the pictures to see the patterns.


I've got a few more free patterns that I'm going to post in the next few days, some of which will also make good little extras for Easter, so keep an eye out for those.